Monday, 29 February 2016

Making moulds for Silicon

To make the silicon parts of my characters, I was going to follow the advice I received from Animation Toolkit and use Aluminium resin to create the moulds. Unfortunately, my uni doesn't stock aluminium resin, and I cannot afford to buy it as it would push me over my budget. The technicians down in ceramics suggested I use Jesmonite Acrylic Polymer to make my hard moulds as it is very solid and holds a lot of texture. I am experimenting with this and if it doesn't work I will try the resin available in ceramics or buy some in. 


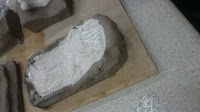
First, to make the moulds, I placed each plasticine limb of my characters half into clay and secured it around the edges so that no jesmonite can seep into the gaps around the plasticine. I also built a little wall around each limb so that the jesmonite could stay in place.


Once the clay was in place, I mixed up some Jesmonite. I have to mix one part of the liquid with two and a half parts of the powder. For example, 100g of powder is mixed with 40g of liquid to make the right consistency. I poured some of this mixture into each mould to create a thin layer covering over the limb, then I put in pieces Quadalaxial Fibreglass, which makes the Jesmonite stronger for the mould making. This is similar to hessian placed into plaster moulds. Once the fibreglass was put into the first layer of Jesmonite, I covered it all with a second layer of Jesmonite and made sure the top was level and fully covering the whole limb. 


Once this half was dry, I flipped the mould over, removed the clay base and rebuilt a clay wall around the edge. I made sure I got all the clay out from around the plasticine and put a small amount of vaseline over the first half of the mould to stop the second half of Jesmonite sticking to it. 
I then repeated the Jesmonite and Quadalaxial fibreglass steps and left this to dry.


 Once this half was dry, I removed the clay and carefully pried the two halves apart. I then removed the plasticine limb from the middle, cleaned the mould and it was then ready for the silicon. 


I will need to drill into the jesmonite to create a space to put the armature in when casting, which I had forgotten to do. I then did a quick cast in wax to make sure all the plasticine and flakes and dust from drilling was out and the mould was clean. This also helped me to see that all the details had worked and the mould had been successful.


I will need to do a quick silicon test before putting in the armature to make sure i get the mix correct so that the silicon doesn't end up too sticky.

For the moulds for the Miller and the Millers Daughter, I made sure not to make the same mistakes that I made in the first batch of moulds. I made sure that I left a space in the mould for the armature to go through and on the feet I built in a channel for the tie down elements. This should mean that I wont need to use the drill.


Considering materials: The girls hair.

 I have started to think about how I am going to go about animating the girls hair. She is the only character with hair or clothing that will need to move, so I have had to look for inspiration and ideas of how to make this happen seemlessly. Having seen and heard about Corpse Bride and how her character was created, I decided to look into how they made her hair.

Graham G. Maiden:
"With Corpse Bride, her hair was quite a problem for us. All the puppets have to look the same, 
and yet she’s got quite wild messy hair that also has to animate. What we did was use a 
combination of a brass skullcap that had wires that were attached to foam that was baked over it. 
Over this mohair was impregnated with silicone. We individually looped and curled the hair 
with the silicone and glued that into the head. We didn’t want any crawl to occur during 
animation, you know, anything moving around that we didn’t intend."

I won't be able to get a brass skullcap with wires and foam baked over it, but I might be able to create a foam based wig, with floral wire and fake hair. I will need to do some experimenting. A last option might be stealing the hair/ top of the head from a barbie doll and attaching that to my puppet.

Girl character design

Anna Denison is designing the last two of my characters. I asked Anna to design them because I love her style. She designs very nice, slightly old fashioned looking characters that would suit the style of my animation and set very well and she is a very talented drawer. 


I didn't have as much contact with Anna while she was designing these characters as I did with Cara. This still worked well though and I am happy with what we ended up with. She first sent me a selection of ideas she had been working on (above) and then let me choose the elements that I preferred from each character. I said that I preferred the one on the far right, as her long straight hair looked really nice and I preferred her outfit. I thought that the one second to the right looked too old and too regal or too wealthy, which wouldn't suit the poor miller's daughter character, and the one second to the left also looked a little bit too old. I quite liked the one on the left too but her outfit and hairstyle looked a bit too intricate for me to make and animate. We decided that we would go for the hair and outfit of the girl on the far right, but the face of the one on the far left as this would make her look quite young and pretty. I also decided to try her with darker hair.


This is the final design for the character. She kept the colours quite neutral as this would fit with her coming from a poor background. I really like the ginger hair, I think it suits the character better than blonde hair and will fit well with my style of animation. I will need to work out how to create the chest and neck, I might have to make a chest plate in silicone and fit it on underneath the clothes. It might be easier to make the whole character in silicone though. I will need to do some testing.

Sunday, 28 February 2016

Set Design: Tower Room


As Sophie is not able to do the last two set designs, I have done a rough sketch of what I think the tower/ dungeon room shoul look like. I made the room round because if it's in a tower it would have to be. I included two characters in the image so that it gives an idea of scale and I wanted the bricks to be all different sizes and shapes. I added in a pile of straw as reference because the room will need to be filled with straw for the story.


I also did a quick sketch of the floor plan for the set. It would only need 3/4 of the walls included so that I could get the shot from where the last section of wall would be and so that I could reach in and animate. 

Tuesday, 23 February 2016

Plasticine puppets: King

 To save time and money, and because I am making the puppets out of different materials, I have decided that instead of making a whole plasticine maquette to make a mould from, I would only make the elements of the characters that were exposed and not covered by clothes. For the king, that means only the head and hands. 

The hands will be made of silicon, so I will need to cast them in a resin mould. I made the hands with a section of the arm so that it can be tucked way up into the sleeve to give the appearance that it is all connected and so that if the sleeves move up a little while animating, the hands wont pop out of the end. This will also make it easier to attach the clothing to puppet as well. I tried to include as much detail as I could, as silicon is good for picking up details and this will add to the overall quality of the puppet.


The head of the puppet will be made from resin, and so will need to be cast in a silicon mould. I added a fair amount of detail into the head, however I have not sculpted the mouth as I intend to use stick on mouths to create facial expressions. I also haven't sculpted the eyebrows for the same reason. The eyes will be made later and added in so that they can be moved so I have just left holes for the eyes to fit in.

Plasticine puppets: Rumplestiltskin


To save time and money, and because I am making the puppets out of different materials, I have decided that instead of making a whole plasticine maquette to make a mould from, I would only make the elements of the characters that were exposed and not covered by clothes. 

Rumplestiltskin's character has a fair amount of skin showing. He has his feet and ankles, his hands and arms, his head and his neck and a patch of his chest showing. This means that I have to make a lot of body parts for the moulds. For the feet, arms and neck, I will need to make resin moulds as these parts will all be in silicon so that they can move. I have sculpted as much detail into the feet and hands as I can as silicon has the ability to pick up small details. This means that I can make the puppet more detailed, hopefully adding to the visual quality of the puppet. I made the feet and ankles come up a little bit higher than necessary so that the trousers can hang over them without the danger of riding up to far and exposing the armature. This should make animating more manageable. 


Rumplestiltskin's shirt is short sleeved and torn which means that I had to make his arms reach all the way to his shoulders to avoid the possibility of exposing the armature on his shoulders. 


For Rumplestiltskin's head, I will need a silicon mould as I intend to make the heads out of resin. This will allow me to use stick on mouths and eyebrows to create expressions. It is for this reason that I have not sculpted the mouth or the eyebrows, as I hope to be able to create multiple expressions. I will not, however, be lipsyncing the characters so they don't need to have too many expressions. The eyes will be added later so that I have the ability to move them around, so I have sculpted deep holes that I will cut out of the resin. 


The neck is an issue on this character, and will also be an issue for the girl character as they both wear either low cut tops or ripped tops that expose some skin. This means that the chest needs to be partially made in silicon to prevent the armature peeping through. I have sculpted a simple neck with a portion of chest to solve this problem. I have made the neck longer than it needs to be so that it can go up into the head to make sure there won't be a gap between the head and the neck when the puppet moves around. 

Friday, 19 February 2016

S.C.R.A.P.

Today, Elliot and I went on an adventure to find S.C.R.A.P, an organisation that collects huge amounts of craft materials and sells them at cheap prices.

We went looking for useful materials both for the sets and props for elliot, and for the clothes for my puppets. 

We found many useful materials and will be going back with a list of items that we need. They have huge rolls of many different fabrics that will be very useful for my costumes.

We also bought some teddy bear felt for elliot to experiment with for the grass as that is how Aardman make their grass for their animations, which we learnt at Manchester Animation Festival.

Overall it was a successful day and we will be going back when we have a better idea of what we're looking for, as the large amount of materials on offer was quite overwhelming.

Tuesday, 16 February 2016

Armatures


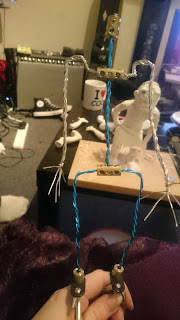
I bought four armatures from Animation Toolkit, three of the cheapest ones and one of the mid priced ones. I made the armature for Rumpelstiltskin with one of the cheaper armatures as he is quite small and so I wouldn't need to cut all new pieces of metal down as the mid priced armatures came with set lengths of metal. I followed the instructions that came with the armature to assemble it and measured out each stretch of wire against the clay maquette that I had made. The problem with this armature is that the hands can't be replaced very easily so if the hands break while animating it will be very difficult to replace them. However, my animation is very short so hopefully they won't be overworked to the point of them breaking in the short amount of animation.

The King's armature was more difficult. I used the mid priced armature as his character is very big and potentially quite heavy so I didn't want the wire to bend inside him. I assembled the armature by following the instructions provided, but the armature ended up too tall so I had to go to the metal workshop with the spare pieces of metal and get them cut down to the correct size to make the legs about 2cm shorter. This armature easily manages to loosen itself which will be really inconvenient when animating so I will need to use some glue to make the connections less likely to loosen themselves. I will have to be careful to not let the glue get into the joints making them unable to move as this will limit the movement too much.

The miller and the millers daughter armatures were both done with the cheaper armature as I found these easier to manipulate and, as my characters wont have to move too much and are unlikely to break in the short animation that I will be creating.


Castle Set Design

Sophie has finished the Castle Design. The first design she did I thought was a bit too straight and sturdy looking, and suggested making it a bit more crooked and sinister looking.


I really love the final design, but I think the scale will need to be adjusted, which I spoke about with Elliot when I saw him today to talk about sets. We both agreed that the castle will need to be taller to accommodate the 30cm tall Troll King. 

The meeting with Elliot went well. We discussed the set design and Elliot is excited about building it. We discussed how the set will be built, and have decided a fairly thin board would work for the base, and the castle will be build with cardboard and modrock. Elliot said he will be doing some material tests this week to work out the best way to do the path, grass and trees, and he should have the set completed in two weeks.

Unfortunately, Sophie has been offered an amazing opportunity and is now unable to design the last two sets, so I will be needing to design these two, but Sophie is still good to draw up the storyboards.

About Me

My photo
I'm Becky, although I do also answer to my surname- Gilby. I am a 22 year old Animation student at Leeds College of Art, specialising in Stop Motion Animation and Puppet making. I hope to make it into the stop motion industry making puppets.